 |
| Other side of sham |
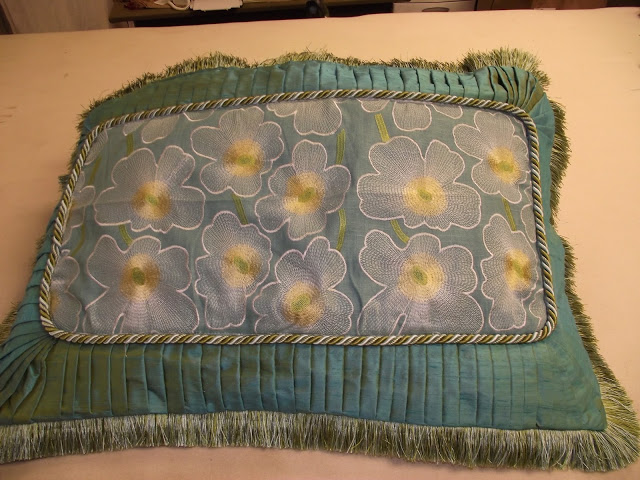
No well dressed traditional bedroom should be without beautiful pillow shams.
I always make mine reversible and as fancy as my client will allow. They really are the most important decorative item on the bed.
This embroidered linen floral is what the room scheme is built around, but the shams are the only place I used it. I know that is all the exposure it will need in the room.
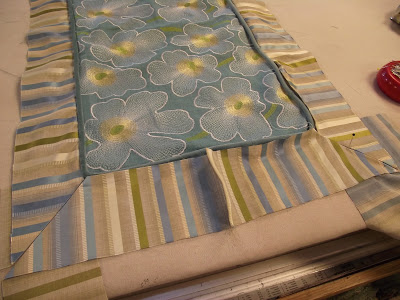
Because my plans called for silk to be pleated around the outer 4" of the sham it was necessary to have the lining to pin and sew it to.
 |
| lining cut the finish size of the sham |
 |
| 8" long corner pieces cut. |
4 pieces of silk were cut 8" wide and about 12" long. One for each corner.
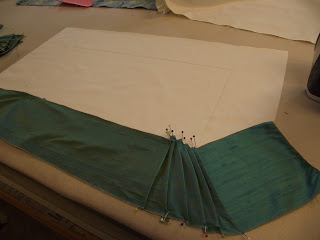 Starting in the corner with the 8" piece the silk is pinned on both sides and the pleating begins. To fan the fabric out around the corner it is necessary to use hardly any fabric in the outside pleat and very much more on the inside pleats. I planned for my pleats to be about 3/4" wide. Once the corner piece is pinned you can simply slip about 4" of the 5" wide silk under the corner piece, pin and continue to pleat. Always fold the fabric in the same direction as you pleat. I don't often have the patience to measure things like this but go by sight. If you are more comfortable measuring do so.
 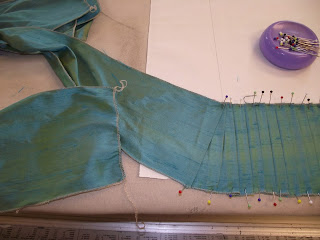 |
| first side pleated , tieing into the corner |
To measure for a 3/4" pleat, pinch your first pleat so that it's fold has 3/4" inches of fabric on both sides. Pin it flat to the table. Place your ruler's 1 1/2" mark on the outline of the fold under the pleated fabric. Fold your fabric to the 3/4" mark, hold in place pull out the ruler and pin top and bottom. Repeat the process until reaching the next corner. Cut the fabric about 4" longer than the last pleat. Fold the first pleat of your corner fabric and pin it over the 4" of 5" pleating fabric.
Also pin the fabric even with the guide line drawn on the lining. Let the excess go beyond
the lining. Repin all the pleats to the lining. Sew the top edge 1/4" in from the edge of the silk. Flip the lining and silk over and sew the outer edge of the lining to the pleated silk. Sew it also 1/4" in from the edge.
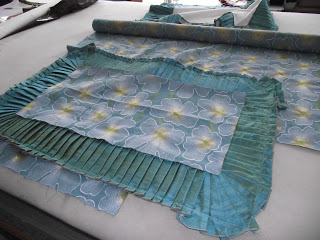
Measure and cut the main-center piece of fabric.
It should lay about 5/8" over the pleat top on all sides. Make a 1/4" welt cord or use a lip cord trim.
Sew the welt or trim piece to the edge of the fabric with a 1/2" seam.
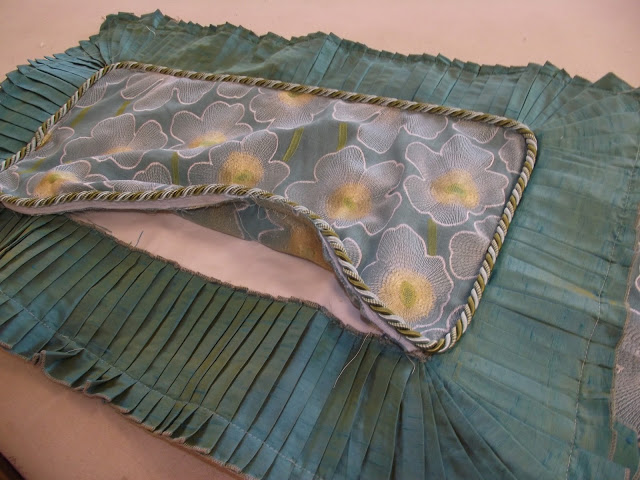
Position the trimmed center piece of fabric on top of the pleated fabric. Pin in place and with your zipper foot stitch it as close as possible to the edge trim. Be careful that the lip of the cord stays folded under.
If you want more now it's time to start the other side.
 |
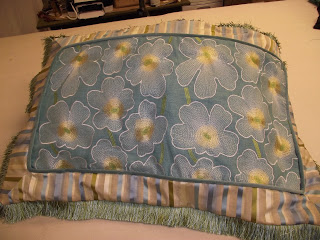
| Other side of the reversible sham. |
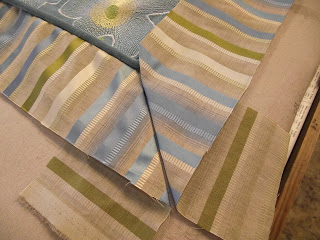
Initially my plan was for the other side of the pillow sham to be covered in the main floral fabric only. But I had a little of the drape and dust skirt fabric left and couldn't stand the thought of one side being so fancy and the other side plain.
This time there is no lining needed because there is no pleating. I cut the center the same size as used on the other side, covered a 1/4" cord in velvet left from the bed cover and sewed it to the main fabric. The stripe was cut with a total of 1" seam allowances. The amount of stripe left only allowed me to cut the pieces with the stripes running toward the center of the pillow. There is a reason you don't see stripes done this way often. The reason is that for it to look right the corners must be mitred.
All strips were sewn together end to end. Care was taken to be careful to get a perfect pattern match for an almost invisible seam.
To do this you do one side at a time. Sew the first strip allowing about an inch more than the width of the strip on each end. Place it on the sewing machine with the center piece on top and the stripe strip on the bottom, so you can stitch over top of the trim seam on the center piece.
 |
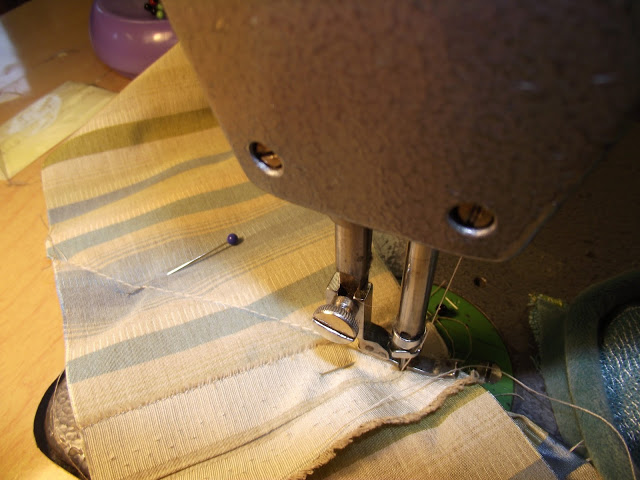
| Here the second strip is being aligned to the first one sewn |
If you look closely at this particular stripe, each stripe has a grosgrain type on one side only.
Because of the grosgrain stripe it is necessary to turn the next strip of fabric upside down to get the mitre. In the picture you can see that the grosgrain stripe next to the blue stripe is on the left of the blue and on the right of it on the other strip.
Because of the grosgrain stripe it is necessary to turn the next strip of fabric upside down to get the mitre. In the picture you can see that the grosgrain stripe next to the blue stripe is on the left of the blue and on the right of it on the other strip.
Turning the strip would not be necessary if each stripe was balanced(the same on both sides).
While I am not showing it in this picture, aligning the corner mitre would be easier if the
top of the strip were turned down 1/2" (your seam allowance). The easiest way to check the angle of the corner fold is to be sure the edge of the strip is perpendicular to the stripe seen on the underside of the fabric.
 |
| Stitch the two pieces together on crease made by ironing. |
 |
| Corners pressed for seam mark ready to be folded and pinned for sewing |
 |
| Under side of mitre after sewn |
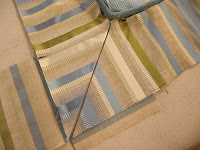
All this works well until you get to the 4th corner. How do you make it miter correctly? With some bold or simple 2 color stripes you may actually have to cut the strips first, lay them out in a rectangle or square depending on the pillow you want to finish with.
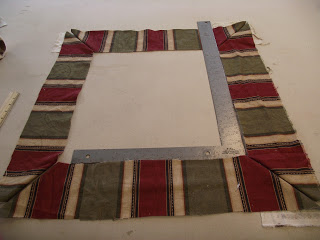 |
| Center is checked for square before corner is pressed, pinned and sewn |
As you can see once you have the strips laid out you can adjust for size by adjusting all four corners. This of course means if all corners are going to be the same the size and repeat of the stripe will dictate the sizes possible.
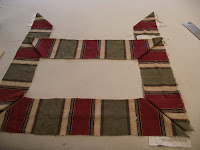 |
| Repeat of 9" allows for a 27" square or a 18" x 27" rectangle |
As you can see this stripe has a 9" repeat so the pattern allows for a 27" x 27" square pillow. If I want a rectangle it would have to be 27" by 18".
That is the big disadvantage of bordering a pillow with a large stripe running perpendicular to the edge of the center piece of the pillow.
 |
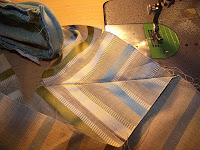
| Final stripe pieces is readied to finish pillow. |
With a small multi color stripe not having the 4th corner match the other 3 is not as important as with a large bold stripe. It is important, however that the corner be mitred. With this kind of stripe it is possible to remove some of the stripe in the middle of the piece. As you can see in the picture the corner is first matched for the final mitre. Then it is determined what part of the stripe can be removed to shorten the piece to achieve the final mitre. The piece standing up was pressed each direction to create a marking crease. A tight stitch was used to sew crease to crease. It was then cut and seam pressed open. The final mitre was done.
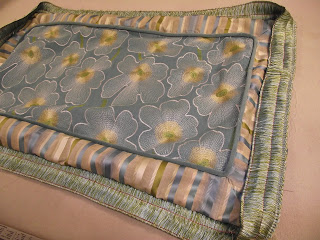 |
| Brush fringe is attached to one side of the pillow. |
Brush fringe was attached to one side of the pillow.
The final step is to sew both sides together.
Both pieces were pinned face to face. The pleated silk edge is not even, but it was stitched 1/4" from the edge of the lining. Since it was easy to watch edge with the brush fringe sewn on, that part is put down and the side with the silk is watched. Start on a long side that you determine will be the bottom. Start about 6" from the corner and sew toward the shorter side. Continue around the edge until you reach the long side you started on. Only sew in 6" again. Lock the stitch well. The space not sewn is where you will sew velcro for an invisible closure which allows the sham to be reversible. Always sew the hook side(more plastic side) on the edge the brush fringe is sewn to. Sew the loop side on the opposite side. The fringe trim is less apt to get caught on the hook velcro if it is sewn this way.
done
I hope this was helpful and understandable.
Bill Gantt